Feb 6, 2012

Bar Cart It Is!

Guys, I can't even fake it. I am DEVASTATED about the Super Bowl last night. Ugh, I wanted the Pats SO badly. I can't even talk about it yet, too soon. Mike is equally devastated, he's sent me at least 12 texts this morning reiterating that fact in different ways ("I'm glum city USA." for example). We'll have to kick butt next year. Brady and Belichick WILL get another one. Trust.


Anyways, because my mind was so preoccupied with football this weekend, I didn't write a post and now I'm too bummed to write one. But just as a quick peek, here are a few pics of the bar in production. (Bar Cart won!) We drew up a good (I hope!) plan, went to the big orange and picked up parts and started with the painting and sanding. I'll be working on it this week so hopefully a final product is not too far off! Here's what we got for now:


 Drawing up plans and putting parts together at Home Depot.


The wood slab that started it all after the first pass of sanding,


and a gratuitous Oats shot. This was going on while we watched the big game. Clearly he's not as into the Pats as we are.


Alright, is anyone as sad about the Super Bowl as I am? I will try to stop sulking ASAP.

Feb 3, 2012

It'll Wake You Up: Coffee Sack Upholstery


Sometimes I get on these kicks where I just need bright, tropical, calypso colors in my life and I'm only convinced I'll be happy if I surround myself in pops of neon. (I have my melodramatic moments, don't I?) Usually, I'm an earth tone, cozy color kind of girl, but there's always an exception to the rule, right?

The last time the calypso-color-calling-bird sung to me (he's totally the star of the Amazon), I happened to have two old chairs (donated by the in-laws) that were begging for an upgrade. (Now, a forewarning, this happened a while ago and of course, pics are limited. I love the results so much though that I still had to share.)

Here is the before (already sanded a little):


And the upholstery they came to me with:


Underneath which was this beauty:


They are both oilcloth fabrics (read: durable, but so '70s). After unscrewing the seats from the frame, I diligently sanded to rough up all surfaces:


I cleaned and wiped away all the sawdust and got to painting. Everything was brushed on and took about 3 coats. I didn't use a primer. Poor life choice.

Then it was upholstery time, and I opted for some coffee sacks I'd found at Building 19 months earlier. (I washed them in the washing machine before using them. They reeked of coffee and burlap.)  They were graphic and colorful, just what I was going for. I cut them approximately to size, and then staple-gunned the fabric right over the beige oilcloth, wrapping like a present as I went. I screwed the seats back to the chair, et voila! Coffee Sack upholstered chairs that fill the bright color vacancy in my heart.


And over a year later, they are still holding up in our little kitchen.


Have you ever used unusual fabric in usual ways?

(P.S. Last day to vote bar cart or desk!)

Feb 1, 2012

January 2012: A Real Chestnut

I take lots of (poorly lit) pictures and unfortunately, most of them end up in the dark corners of my iPhoto library never to be seen again. That's about to change, baby.

Now that I have this little spot on the interweb, I'm going to use a piece of it to highlight events and fun stuff that happened in the past month. A little monthly re-cap, if you will. Hey, the byline of the blog does say, 'DIY and Daily Life,' right? Hopefully this will work to both serve as a kind of fun, interactive diary and to let you in on a little behind the scenes action that doesn't make it into regular FH posts. I'll also set out one small goal for the month ahead. Oooooo, exciting, right? 


The top 8 (how myspace is that?):


1. We started the month and the year by toasting with champagne. Fun fact: for every New Year that we've spent as a couple Mike and I have a picture of us clinking glasses at midnight. Such crazy kids we are.


2. We exchanged stocking gifts when we got back home after the holiday. Mike filled (and I mean FILLED) my stocking with chestnuts and sprinkles of licorice. If you must know anything about me, know that I live and breathe chestnuts between Thanksgiving and Christmas. I almost had an apoplexy from the excitement after peeking into my stocking!


3. In family news, my heart melted a little bit when I got this picture of my nephew. Don't you just want to pinch those cheeks? They slay me!


4. My dad came up from Florida for a snowy weekend! It was such an amazing treat. He converted us into Lifetime movie freaks. We watched the world premiere (they're very dramatic about premieres on that channel) of The Drew Peterson Story: Unstoppable. OMG. So. Good. Watch it. We also watched like 3 other Lifetime moves. Um, they're amazing, and they're all based on true stuff! A total hidden gem in the high channel numbers.


5.  I got these awesome red shoes and am now obsessed with them. Very Dorothy even though that movie still gives me the creeps. I think I've only made it all the way to the end once.  (From J. Crew)


6. Mike discovered his love for photobombing blog pics. I already have...hmmm...10 of these pics and its only the first month of blogging.  He's cute.


7. Poatsie had a ridiculously adorable moment, but whats new? Oh, if you only knew how many pictures I have of this dog. You'd have me committed. I think there's like 10 from this little session alone.


8. And, finally, I made this bracelet from Honestly WTF blog. Tutorial here. Those are hex nuts from the hardware store! Absolutely genius. The safety pin to the sock is my proprietary bracelet making trick. Secret's out now.


So that was January, full of chestnut-chubby-cheek-Lifetime-movie goodness. Not a bad way to start the year!

February Micro Goal:


Get a good pic of my mug for the sidebar. Something with no one else in the photo...I have surprisingly few of those! And yes, I do think it will take me a whole month to get one I like :).

Jan 31, 2012

Peruvian Ambrosia: Lomo Saltado


Sometimes, nothing but home cooking will do. This weekend, the yen for some good, hearty food from my youth hit and we happened to have all the ingredients for one of my all time favorites: lomo saltado. This is a classic Peruvian dish, and because I'm half-Peruvian, it is  something I grew up with. Not only that, but it's basically one of my favorite dishes ever. Like, I'd take it along with coke slurpees to a deserted island. Trust. It's that good.


It's really a kind of simple stir fry with only a few ingredients. Here are the major players:


That's


  • Potatoes

  • Tomatoes

  • Onions

  • Steak (almost any cut will do)

  • Jalapeño


The portions can be tweaked depending on the number of people. Though it was just the two of us, we cooked extra for leftovers. Lomo saltado for breakfast is out of this world.

The only other ingredients are

  • Rice

  • Canola Oil

  • Salt

  • Red Wine Vinegar

  • Garlic Powder


Simple stuff, right? It's also pretty simple to cook.

1. Cut potatoes into fries and keep them in a bowl of water. (Keeps them from getting brown!)


2. Cut onions.


3. Cut tomatoes.


4. Cut steak into ~inch cubes. (Sorry, forgot to pic this...must have been drooling too badly at this point.)

5. Slice jalapeño latitudinally.

(OK, I know the cutting method is usually indicated in the ingredient list, but it's a personal pet-peeve that the cutting prep is never included in the total time for the recipe. SOMEONE has to chop those veggies!! They sure don't come out of the ground like that! Phew. Rant over :) )

Start your rice however you usually cook it. We're rice fiends here at Folksy Home, so we go rice cooker all the way.


French fries are the next step and really, since this is a two burner meal, batches of fries are going the entire time until they're all cooked.

If you've never made french fries at home before, it's pretty easy, just oil and potatoes. Heat up enough oil to fill about two inches in the pot using medium-high heat (on a back burner for safety!) and pop in one fry. Once that fry starts sizzling, the oil is hot enough. Drain the potatoes and throw in enough to fill the oil (but don't put in so many fries that they're sticking out of the oil.)


There is a great recipe for fries over at The Pioneer Woman Cooks, but I don't get fancy enough to use a thermometer, so this 'go by feel' method works for moi.

Those will take about 7-10 minutes to cook, and just take them out when they start to look like fries. Sprinkle on some salt.

While the first batch is cooking, heat a skillet with a coating of oil to medium-high. Just like the fries, pop in a piece of onion, and once it starts sizzling, you're good. Throw in the onions. (Peruvian tip: If the fries finish before anything else, put them in a glass dish in a 250 degree oven to stay warm and keep them from being snacked on. Oh yes, I have gone through an entire batch of fries while the rest of the dish is cooking. Oops.)


Cook them 'till they're good and soft and then it's time for tomatoes.


After those are in, stir them around. After about 3 minutes, it's time for seasonings. Give the skillet a heavy dash of garlic powder (probs about 1 tsp.), about 1/4 to 1/3 cup red wine vinegar (sounds weird, but trust), and salt to taste. Cook that down for about 5 more minutes or until everything is soft.
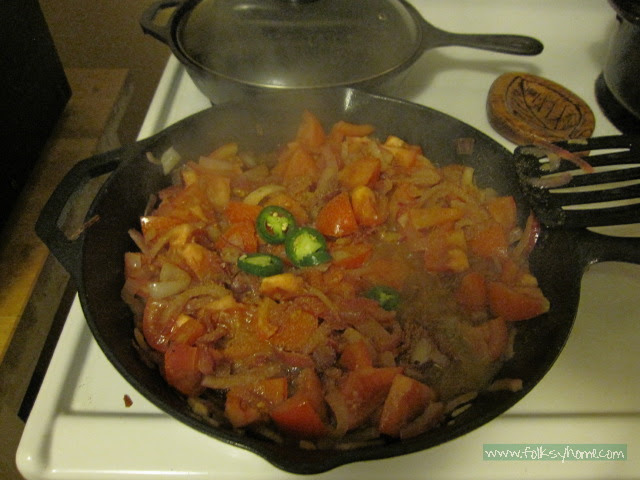


Put the tomato/onion deliciousness in the glass dish with the fries and pop back into the oven.

Re-oil the skillet and throw in your lightly salted meat cubes. Sear them.


If you're like us, and prefer rare over well, the searing process literally takes 2-3 min. If you like your meat cooked through, time accordingly.

Add the meat to your glass dish and you're ready for business.


Put a nice portion of rice on your plate,


serve some fries, and a mix of the onion/tomato and meat. Sprinkle on salt to taste (can you tell I like salt?), and a little jalapeño if you're into that sort of thing.


Tell me now, did that just rock your world or what?

Jan 29, 2012

Be the Decision Maker: Bar Cart or Desk?

Last fall I came across a wood slab that spoke to me at a yard sale. (What, old, beaten pieces of wood don't call out to you? ;) ) After finding out it cost $2, I had to have it. Much to the chagrin of the hubs. But to his credit, he did help me put it in the trunk. Here she is:


I know, it needs a little work. But look past that, it will get there! It's 18'' x 50'', by the way.

The slab sat in the basement until Mike cleaned in there recently. He started using it as a shelf to hold other crap stuff I've hoarded, but little did he know that doing so brought the piece back to my attention. Muahahaha ;)

Of course, now I must do something with it, but I have more than one idea floating around in my head. Bar cart or desk, let the battle begin.


First, the bar cart. Right now we have a small cabinet in the kitchen dedicated to bar stuffs (mixers, spoons, shot glasses, koozies, etc.) and it's not working. Every time I need the bottle opener, an avalanche of breakables comes tumbling out. We could definitely use an upgrade.

Here are some inspiration photos for what the wood-slab-turned-bar-cart could look like. I couldn't find any bar carts with slab tops, but these at least give you the feel of what I'd go for.


Of this ilk? From here.


 A rustic/industrial feel? From here.


Maybe with a pop of color? From here.


And then there's the desk...With this new blogging thing I'm into I could use a pretty place to channel my genius ;) . Here are some inspiration photos:


Those hairpin legs are to die for. From here.


Or maybe something like this...are you getting the rustic/industrial theme yet? From here.


The truth is, I could/would use both of the pieces equally, so there's no pragmatic advantage to either one. Which one do you think I should make??  Yes, I'm talking to you! To help me decide, we have our first ever Folksy Home Poll! Vote vote vote! Without further adieu:

[polldaddy poll=5889686]


Thanks so much for voting. I'll be deciding on Friday! :)

Jan 26, 2012

What does your garden grow?

It's only January, and already I'm thinking of gardening. I've been working lots of hours in my windowless office lately, and, well, Mama thinks it's time for some vitamin D on her skin and dirt under her nails. It's not so much that I want winter to be over (I could definitely use another cozy snow storm), but the need to get my hands in the soil is starting to nag at me, just as it usually does this time of year. This is why I love the seasons, just as I get tired of one, another totally different and equally exciting one comes along with its wonderful smells, lighting, and weather.

Back to gardening. I love it. I'm the kind of girl that plans for last frost and starts seeds accordingly. I'm the kind of girl with grow lights and heat mats. I'm the kind of girl that maps sun movement. There was a quote in the back of an issue of Mother Earth News once, "Gardening is a journey, not a destination" and boy, it couldn't be more true. I am on the gardening train. Choo! Choo! (Sorry, had to!) Here is the first garden Mike and I put in the ground together. It was at his parent's house on Cape Cod where we lived one summer. Who are those children??


And here is the raised bed at Folksy Home in all it's height-of-summer glory:


So because gardening is something I love,  and because I happen to know the difference between a brassica and a cucurbit,  we're gonna be seeing some gardening posts on this little blog. I have a raised bed in the yard (see pic above :) ), and containers scattered around outside, but today, I'm going to introduce you to my winter friends. (Mike actually calls it, 'playing with my friends' when I go out to garden in the summer. He's a funny guy, that husband of mine.) These are the indoor plants that keep my gardening bug sated through all the weather winter brings.

I don't have tons of indoor plants, mostly because I don't have the space. (What I wouldn't do to have a greenhouse!) Surprisingly, though I kill plenty of plants during the growing season (I told you it was a journey!), I have relatively good luck with indoor plants. The trick here is, basically, DO NOT WATER. I mean it. Some of my plants have not been watered since bringing them inside in early October. Seriously. And they're still doing fine.

OK, so here is my oldest and dearest indoor plant.


This is an avocado that happened to sprout in our worm composter back at our apartment in New England. Yep, this guy has been going since 2009! I've transplanted it to a few larger pots and it's still going. I know that it will never produce fruit, but it's fun to keep around. Mike has said of this plant, "I would be devastated if the avocado ever died." Yeah, so I'm desperately trying not to kill it. My basic plan for this guy is water when it looks droopy. During the winter, that's like a pint glass every week or so.


This guy is a money tree. Both this and the avocado live in the kitchen in the winter because that's where it's sunniest. He chills with even less watering than the avocado, maybe a pint glass every two weeks? I try to keep them as dormant as possible so they don't fight to grow in adverse conditions (i.e. a cold an dry kitchen). Funny story about this plant, which I've had since 2007: my cat once ate every single leaf off of this plant except 4. 4! And it came back. And now it's about 3x as big as it was back then. Money tree for the win.

To the right of the money tree is a peace lily given to me by my sister-in-law when she was moving. He got hit with quite the slug problem this summer, and is still fighting to come back. Even less watering for him than the above two. Though after seeing this photo I brought that drooper into the sink for a little drink.

Moving out of the kitchen, and into the bedroom, I have a jade plant on the rope shelves. No water since October!


And a pothos cutting keeping fishy company. (Obviously no need for water. Or soil, for that matter!)


The last little grouping of plants is a stash of succulents that live in the bathroom on the seedling shelf.


I started with a few individual plants (bought at the Philly Flower Show, whoop whoop!!) and then found out propagation was beyond simple and began experimenting last summer. I haven't really attended to them much because, well, winter isn't an ideal time to start new plants, but they're still goin'!


Hopefully when it warms up they'll spring back to life. We'll have to wait and see! No water for these guys, I think they get enough from the shower moisture to tide them over.

So there is the starting line of the indoor brigade. I do have some poinsettias and a few paperwhite bulbs going,


but they're ephemeral and don't last season to season.

What kind of plants do you have inside for the winter?